Multiscan SDK for Android
Setup
- Add idscan-public maven repository to the project build.gradle file.
allprojects {
    repositories {
        ...
        maven {
            url 'https://www.myget.org/F/idscan-public/maven/'
        }
        ...
    }
}
- Add the following to the module build.gradle file:
dependencies {
    ...
    implementation 'net.idscan.components.android:multiscan:2.4.0'
    ...
}
- Add one or more dependencies of components to the build.gradle file:
dependencies {
    ...
    // For MRZ recognition.
    implementation 'net.idscan.components.android:multiscan-mrz:2.4.0'

    // For PDF417 recognition
    implementation 'net.idscan.components.android:multiscan-pdf417:2.4.0'

    // For ZXing support
    implementation 'net.idscan.components.android:multiscan-zxing:2.4.0'
    ...
}
Note
You need component dependency only if you use the component in the project.
Using
For scanning you need setup and call MultiScanActivity:
MultiScanActivity.build(this)

    // For PDF417 component.
    .withComponent(PDF417Component.build()
      .withLicenseKey("** PDF417 LICENSE KEY **")
      .complete())

    // For MRZ component.
    .withComponent(MRZComponent.build()
      .withLicenseKey("** MRZ LICENSE KEY **")
      .complete())

    // For ZXing component.
    .withComponent(ZXingComponent.build()
      .withFormats(ZXingComponent.Format.values())
      .complete())

    .start(SCAN_ACTIVITY_CODE);
Note
Need to replace ** PDF417 LICENSE KEY ** by your License Key for PDF417 component and ** MRZ LICENSE KEY ** by your License Key for MRZ component.
To obtain a license key, please email your application’s package name to support@idscan.net.
Note
Instead of ZXingComponent.Format.values() you can setup one or multiple formats from list: AZTEC | CODABAR | CODE_39 | CODE_93 | CODE_128 | DATA_MATRIX | EAN_8 | EAN_13 | ITF | MAXICODE | QR_CODE | RSS_14 | RSS_EXPANDED | UPC_A | UPC_E | UPC_EAN_EXTENSION
Note
You can use one or more components at the same time. If you use the component you have to add the appropriate component dependency to the module build.gradle file.
To process the result you need to override onActivityResult() of your Activity.
@Override
protected void onActivityResult(int requestCode, int resultCode, Intent data) {
  super.onActivityResult(requestCode, resultCode, data);

  if (requestCode == SCAN_ACTIVITY_CODE) {
    switch (resultCode) {
      case MultiScanActivity.RESULT_OK:
        if (data != null) {
          DocumentData document = (DocumentData) data.getSerializableExtra(MultiScanActivity.DOCUMENT_DATA);
          if (document != null) {
            MRZData mrzData = MRZComponent.extractDataFromDocument(document);
            PDF417Data pdf417Data = PDF417Component.extractDataFromDocument(document);
            ZXingData zxingData = ZXingComponent.extractDataFromDocument(document);

            if (mrzData != null) {
              // TODO: Handle MRZ data.
            }

            if (pdf417Data != null) {
              // TODO: Handle PDF417 data.
            }

            if (zxingData != null) {
              // TODO: Handle ZXing data.
            }

          }
        }
        break;

      case MultiScanActivity.ERROR_RECOGNITION:
      case MultiScanActivity.ERROR_INVALID_CAMERA_NUMBER:
      case MultiScanActivity.ERROR_CAMERA_NOT_AVAILABLE:
      case MultiScanActivity.ERROR_INVALID_CAMERA_ACCESS:
      case MultiScanActivity.RESULT_CANCELED:
        // TODO: Handle the error.
        break;
    }
  }
}
Error codes:
ERROR_RECOGNITIONinternal error.ERROR_CAMERA_NOT_AVAILABLEdevice has no camera.ERROR_INVALID_CAMERA_NUMBERinvalid camera number is selected.ERROR_INVALID_CAMERA_ACCESSapplication cannot access the camera. For example, camera can be captured by the other application or application has no permission to use the camera.
Customization
For customization scanning activity you need to extend MultiScanActivity and override some methods. Also you need to set this activity during setup.
MultiScanActivity.build(this)
  ...
  .withCustomActivity(CustomScanActivity.class)
  ...
  .start(SCAN_ACTIVITY_CODE);
Note
Replace CustomScanActivity.class by your custom Scanning Activity.
Custom Viewfinder
The scanning activity has the following structure:
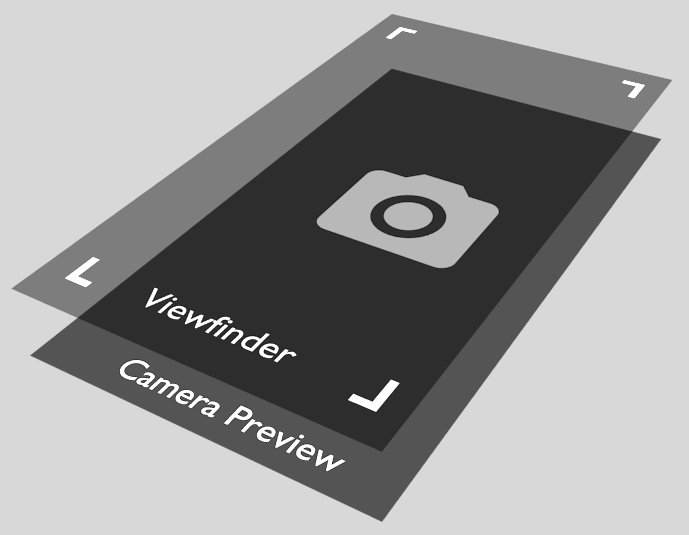
By default, Viewfinder layer is a simple view with a frame. You can replace it with a custom view. For that you need to override getViewFinder(LayoutInflater inflater) method. Also, you can add any views to Viewfinder layer.
@Override
protected View getViewFinder(LayoutInflater inflater) {
  View v = inflater.inflate(R.layout.custom_viewfinder, null);

  // TODO: setup view.

  return v;
}
Note
Viewfinder layer is drawn as an overlay above the camera preview layer, so it should has a transparent background color.
Select camera
You have two ways to select active camera in the scanning activity:
- You can override
selectCamera(int numberOfCameras)method and return the number of desired camera.
@Override
protected int selectCamera(int numberOfCameras) {
    // TODO: Return number of camera in range [0, numberOfCameras).
}
- You can call
setCamera(int id)method to change the current active camera.
Handle scanned data
By default, when document is recognized it returns via onActivityResult method. But you can change this behavior by overriding onData(DocumentData result) method. That is default implementation of this method:
protected void onData(@NonNull DocumentData data) {
  this.finish(data);
}
But you can process scanned data in a different way. For example, you can display the document data on Viewfiender layer. Also you don't have to return the result immediately. Instead of, you can return scanned data at any time in future by calling void finish(DocumentData data) method.
Flashlight
You have two ways to control the flashlight:
- You can set the state of the flashlight during setup by calling
setFlashState(boolean state)method:
MultiScanActivity.build(this)
  ...
  .setFlashState(true)
  ...
  .start(SCAN_ACTIVITY_CODE);
- You can change the state of the flashlight by calling
setFlashState(booelan state).
public class CustomScanActivity extends MultiScanActivity {
    ...
    void switchFlashlight() {
        setFlashState(!getFlashState());
    }
    ...
}