DIVE API/Web Services API to DIVE Online Full Embed Migration Guide
This guide provides steps to help you transition your integration from DIVE API/Web Services API to DIVE Online using the Full Embed approach.
This means utilizing all front end and back-end functionalities provided by DIVE Online, embedding the verification process directly into your application for a seamless user experience.
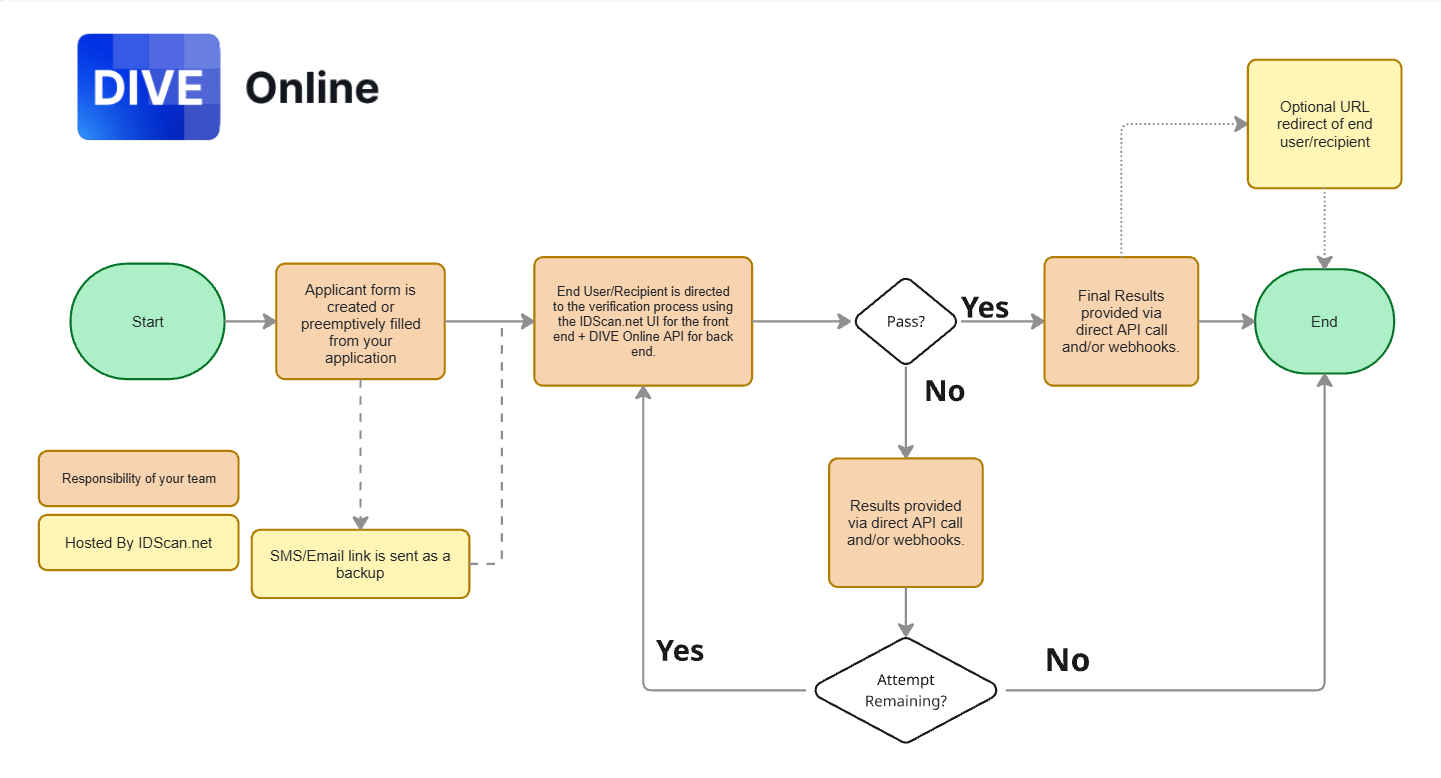
While IDScan.net recommends using our front end tools for the best user experience, the Full Embed approach can utilize your own front end UI or hardware scanner to collect user information and images, while leveraging DIVE Online's back-end verification capabilities.
This page will describe how to migrate with and without the use of DIVE Online's front end UI components.
Steps to Migrate to Full Embed Integration
Step 1 - Create Applicants
Note
This step is required regardless of whether you use DIVE Online's front end UI components or your own custom UI.
In DIVE Online, each individual undergoing verification is represented as an Applicant. You will need to create an Applicant for each user before initiating a verification request.
- Endpoint: Use the Applicants endpoint to create a new Applicant.
[POST] /api/v2/private/Applicants
{
  "firstName": "string",
  "lastName": "string",
  "phone": "string",
  "email": "string",
  "referenceId": "string",
  "metadata": {
    "additionalProp1": "string",
    "additionalProp2": "string",
    "additionalProp3": "string"
  },
  "callbackUrl": "string",
  "sendSms": true,
  "sendEmail": true,
  "accountProfileId": "########-####-####-####-############"
}
The first name and last name fields are always required. If your system does not have this information, you can use placeholder values such as "John" and "Doe". Alternatively, you can build out a front end form to collect this information from the user before creating the Applicant.
- Response:
The
applicantIDfield in the response would then be used for the rest of the development process.The response will include the validation link that can be sent to the applicant via SMS or Email. If you set
sendSmsorsendEmailto true, DIVE Online will handle sending the notification.- Due to being a Full Embed integration, it is common to set these fields to false and handle notifications through your own system. This way the applicant can be directed to your own embedded verification flow and never leave your application.
{
  "applicantId": "########-####-####-####-############",
  "validationLink": "string",
  "shortValidationLink": "string"
}
Step 2 - Pass the Applicant ID to the Front End
Users who choose to utilize DIVE Online's front end UI components will need to embed the verification interface into their application. Once this is done, the user will complete the verification process within your application.
The applicantId obtained from Step 1 will be used to load the appropriate verification session.
Step 3 - Validation/Authentication Request
For users who use their own custom UI or hardware scanner, you will need to create a Validation or Authentication request to initiate the verification process for the Applicant.
Users who use DIVE Online's front end UI components do not need to perform this step, as the validation process is automatically handled when the user completes the verification on the embedded interface.
Alternatively, you can also call the Upload Documents endpoint to store any pre-captured images or documents to the Applicant before initiating the validation/authentication request.
Step 4 - Receive Verification Results
After the user completes the verification, you can receive the results in multiple ways:
- Webhooks: Set up webhooks in the DIVE Online Web Portal to receive real-time notifications about verification status changes.
- API: You can periodically check the status of the Applicant using the GET endpoints to retrieve the latest verification results. The Validation endpoint will also return data.
- Event Handlers: If you are using DIVE Online's front end UI components, you can utilize event handlers to capture verification results directly within your application.
Additional Considerations
- Account Profiles: Ensure that you are using the correct
accountProfileIdwhen creating Applicants, as this determines the configuration used for the verification process. If not specified, the default Account Profile will be used. - Other Endpoints: The endpoints above are the primary ones needed for a Full Embed integration. However, you may explore other endpoints in the API Manual for additional functionalities as needed.