DIVE API/Web Services API to DIVE Online Low Code Migration Guide
This guide provides steps to help you transition your integration from DIVE API/Web Services API to DIVE Online using the Low Code approach.
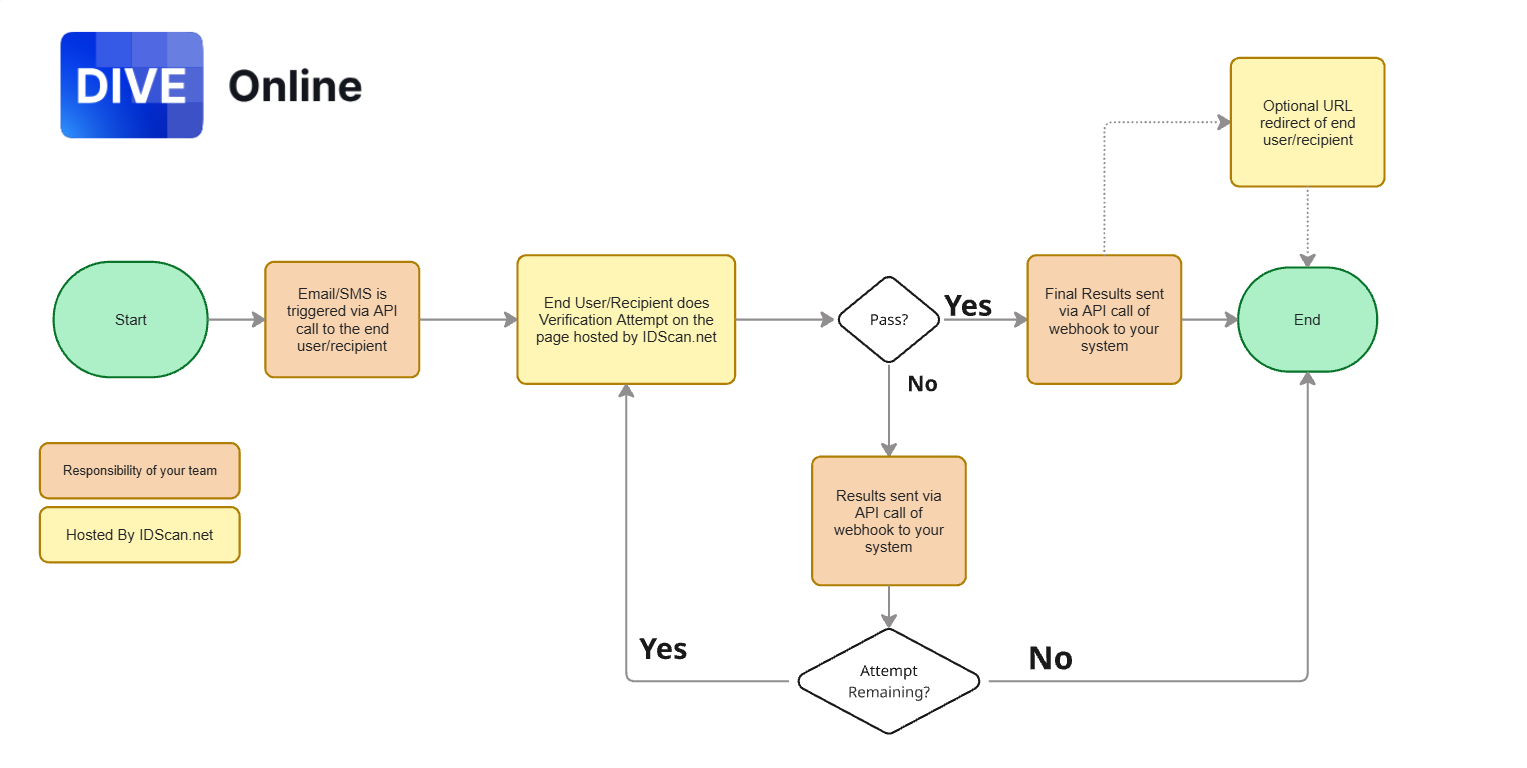
This means utilizing the SMS/Email notification method to direct users to the IDScan.net hosted verification pages, minimizing the need for extensive backend coding.
Steps to Migrate to Low Code Integration
Step 1 - Create Applicants
In DIVE Online, each individual undergoing verification is represented as an Applicant. You will need to create an Applicant for each user before initiating a verification request.
- Endpoint: Use the Applicants endpoint to create a new Applicant.
[POST] /api/v2/private/Applicants
{
  "firstName": "string",
  "lastName": "string",
  "phone": "string",
  "email": "string",
  "referenceId": "string",
  "metadata": {
    "additionalProp1": "string",
    "additionalProp2": "string",
    "additionalProp3": "string"
  },
  "callbackUrl": "string",
  "sendSms": true,
  "sendEmail": true,
  "accountProfileId": "########-####-####-####-############"
}
The first name and last name fields are always required. If your system does not have this information, you can use placeholder values such as "John" and "Doe". Alternatively, you can build out a front end form to collect this information from the user before creating the Applicant.
- Response: The response will include the validation link that can be sent to the applicant via SMS or Email. If you set
sendSmsorsendEmailto true, DIVE Online will handle sending the notification. TheshortValidationLinkcan be used for easier sharing.
{
  "applicantId": "########-####-####-####-############",
  "validationLink": "string",
  "shortValidationLink": "string"
}
Step 2 - Client User Flow
Once the Applicant is created, the user will receive an SMS or Email with a link to the verification page hosted by IDScan.net. They will then complete the verification process on that page.
Step 3 - Receive Verification Results
After the user completes the verification, you can receive the results in two ways:
Webhooks: Set up webhooks in the DIVE Online Web Portal to receive real-time notifications about verification status changes.
Consume API Response: You can also query the GET Applicant endpoints to retrieve the verification results.
This is most commonly done by the below endpoints:
[GET] api/v2/private/Applicants/{applicantId}
[GET] api/v2/private/Applicants/{applicantId}/Attempts/{attemptId}
[GET] api/v2/private/Applicants/{applicantId}/Attempts/{attemptId}/Images
More details on these endpoints can be found in the Applicants Manual.
Additional Considerations
- Account Profiles: Ensure that you are using the correct
accountProfileIdwhen creating Applicants, as this determines the configuration used for the verification process. If not specified, the default Account Profile will be used. - Callback URLs: You can specify a
callbackUrlwhen creating an Applicant to have DIVE Online notify your application when the verification is complete. This URL must already exist in the DIVE Online Web Portal under Callback URLs. - Other Endpoints: The endpoints above are the primary ones needed for Low Code integration. However, you may explore other endpoints in the API Manual for additional functionalities as needed. For example, you might want to use the other Applicants endpoints to renotify applicants or force completion of pending verifications.