iOS – Camera ID Scanning SDK
The iOS Camera Scanning SDK captures information from the 2D Barcode on a Driver’s License or ID using the device’s camera (recommendation is 5 Megapixels camera or better).
Camera Scanning SDK – Download
Implementation
Objective-C
Add BarcodeScanner.framework to your project

Add BarcodeScanner.framework in Embedded Binaries

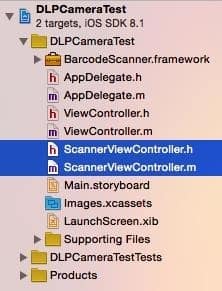
Add **ScannerViewController
**

In order to receive the “cameraKey” (License Key) send an email to support@idscan.net with the app’s Bundle ID. Please be sure to provide your order number in the email once ready to upgrade from trial to production mode. Note: When setting up a device to use both the Camera Scanning SDK and the ID Parsing SDK, both SDKs need to be activated separately. The Camera Scanning SDK and ID Parsing SDKs require two separate Registration Keys which needs to be applied.
To register the library use
[scanner registerCode:@"cameraKey"];
To get the result from the image utilize
NSString* result = [scanner scanGrayscaleImage: frameBuffer Width: width Height: height];
If you plan to customize the camera interface , in the method
(void) CustomeOverlayfor all elements apply[self.view bringSubviewToFront:elementName];
To parse the scanned information into a readable format, use the iOS ID Parsing SDK.
Swift
In you Swift project you should follow the same way, as in the Objective-C:
Add BarcodeScanner.framework and our camera class (ScannerViewController) to you project
Add the personal camera key Value to User Defaults (for example in the didFinishLaunchingWithOptions: method )
let settings = UserDefaults.standard
let key = "" //your key
settings.set(key, forKey: "cameraKey")
settings.synchronize()
Make you own class and Inheritance it from ScannerViewController, add a “Close” button to your Camera view controller (don’t forget to move the button to the front)
 class SwiftViewController: ScannerViewController {
  override func viewWillAppear(_ animated: Bool) {
   super.viewWillAppear(animated)
   let rect : CGRect = CGRect(x: 20, y: 20, width: 100, height: 30)
   let close: UIButton = UIButton(frame: rect)
   close.setTitle("Close", for: .normal)
   close.backgroundColor = UIColor.darkGray
   close.addTarget(self, action: #selector(closeBtn), for: .touchUpInside)
   self.view.addSubview(close)
   self.view.bringSubview(toFront: close)
  }
 }
If you want to make you own Camera Class from scratch, you should do this:
- Import BarcodeScanner.framework to you project
import BarcodeScanner
- Make instance of scanner
var scanner = Barcode2DScanner()
- Register camera with you key (for example from UserDefaults)_
scanner.registerCode(UserDefaults.standard.string(forKey: "cameraKey"))
- Call scanGrayscaleImage(pp_image: width: height:) method from instance:_
var result = scanner.scanGrayscaleImage(UnsafeMutablePointer!, width: Int32, height: Int32)
pp_image – Pointer of grayscale image, describing array of pixels capacity. Capacity = width*length._
Swift implementation of our framework you can download HERE.
How to Activate
IDScan.net offers licensing model based on app’s Bundle ID. You can email us your bundle ID to obtain a trial development key.
Copy your application Bundle ID and email to support@idscan.net
IDScan.net will issue you a unique Serial number/Registration Key for this Bundle ID
There are two ways to apply the serial number.
- During design time, paste the serial number in the file dlpSerial.txt in XCode. The file should contain only the serial number. See the screenshot below:

- To allow the end user to enter the serial, do it programmatically – by applying the method
(yourserial = generated string)
[[NSUserDefaults standardUserDefaults] setValue:yourserial forKey:@"cameraKey"];

Click on “Enter DLP serial” to enter serial key.
- When using both the Camera Scanning SDK and the ID Parsing SDK, you will need to activate both SDKs separately, which you can do by adding another button for the end user with this code:
[[NSUserDefaults standardUserDefaults] setValue:yourserial forKey:@"DriverLicenseParserCurrentSerial"];
or by adding this code to theviewDidLoadmethod or your main view, which will allow you to put the Camera SDK key in the first line of dlpSerial.txt and the ID Parsing SDK key in the second line:
 NSCharacterSet *newLineCharSet = [NSCharacterSet newlineCharacterSet];
    NSUserDefaults *settings = [NSUserDefaults standardUserDefaults];
    NSString *path = [[NSBundle mainBundle] pathForResource:@"dlpSerial" ofType:@"txt"];
    NSString *keyFile = [NSString stringWithContentsOfFile:path encoding:NSWindowsCP1252StringEncoding error:NULL];
    NSArray *keyLines = [keyFile componentsSeparatedByCharactersInSet:newLineCharSet];
    [settings setObject:keyLines[0] forKey:@"cameraKey"];
    [settings synchronize];
    [[NSUserDefaults standardUserDefaults] setObject:keyLines[1] forKey:@"DriverLicenseParserCurrentSerial"];